
Power Logger MAP Connection
Bob Bailey's Power Logger is a major step forward in data logging for the Turbo Buick. One of the really useful features is the ability to log Boost, EGT, Wideband 02, and other items such as fuel pressure IF the appropriate hardware is available.
The analog dash cars come with an LED boost gauge and a two bar MAP sensor that drives it. On these cars, the MAP sensor does nothing with regard to regulating fuel or spark, but, simply serves to feed the factory boost gauge. Therefore, it must be wired into the analog input block of the Power Logger as it cannot be sourced directly from the ECM. (Note that if you wish to measure more than 15 psi of boost accurately, then you need to exchange the original two bar sensor for a three bar unit which will give us an accurate measure to about 28 psi)
In it's most simple form, all that is required is to "tee" into the MAP output signal wire under the dash and connect it to the analog input block. This may not provide an accurate boost number as the MAP receives its 5.0 volt reference signal from the instrument panel rather than from the ECM. If this reference voltage is not very close to 5.0 volts, then the boost numbers will be skewed rather than accurate.
Digital Dash cars do not normally have the wires in the harness under the dash as they did not use a map sensor. If you are working on a car with a digital dash, it will probably be easier to connect the map to the tps 5.0v and ground wires and then run a wire into the car from the map output (green wire) to the analog input block of the PL.
The following pictures come from one of my cars where the 5.0 volt reference signal measured 5.13 volts at the gray wire at the MAP instead of the theoretical 4.96-5.04 volts which seems to be normal from my experience. This made the reported boost number higher than it should be.
In order to connect the MAP to the Power Logger and get the most accurate boost numbers:
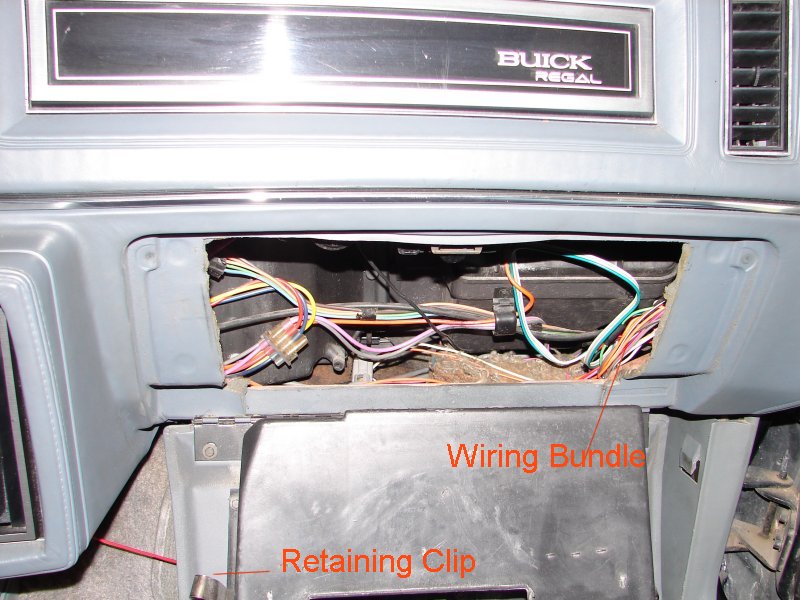
1) Empty the glovebox and drop the door all the way down by depressing the retaining clip while pulling the door all the way down.
2) Locate the wiring bundle shown in the picture below. It is pulled out slightly in the picture for better access. The upper end of the bundle loops back above the glovebox opening and goes to the instrument cluster. The lower end goes to a connector that is somewhat hidden between the hvac ducting and the inner fender. From the connector, the wiring goes into the engine compartment.

Now, to begin connecting the MAP to the Power Logger Analog Input Block
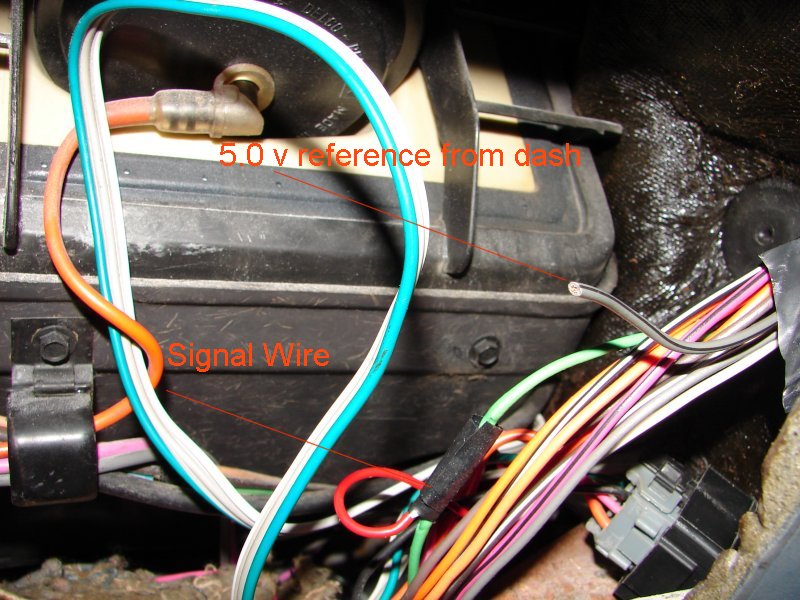
1) Locate the the light green wire in the wiring bundle. It is the signal wire coming from the MAP and going to the LED boost gauge. Tee a wire into it. If you look at the picture and see the black tape, then you will see the red wire I soldered to the green wire. If you have some quality wire taps, you could use them to make the Tee connection rather than soldering. Note that the green wire does not need to be cut, and, the LED gauge will still work...particularly if you use the rebuilt boost gauge and tach from Caspers.
In order to be sure that you picked the correct green wire....Check the voltage in the wire with the key in RUN position, but, with the engine OFF. At sea level, you should see approximately 1.6 volts. The higher the altitude, the less the voltage. It should drop about 0.1v for each 2000 ft of altitude. These voltages refer to a Three Bar MAP Sensor.
I believe that a two bar sensor will read 2.4-2.5v in the same condition.
2)(The following is not necessarily required. If the measured voltage on the gray wire at the sensor is very close to 5.0v, then the boost readings should be very close. You might check the ground wire at the sensor to also make sure it is a good ground. That will help in getting a more accurate voltage) Now, locate the gray wire with the black stripe. This is the wire that brings the 5.0 signal from the dash-except it is seldom very accurate as noted above. Pull the wire out, and cut it into. The end shown below is the part that goes back to the dash cluster. It is not used. The other end that goes under the hood has been pulled down below the dash and is shown in the next picture.

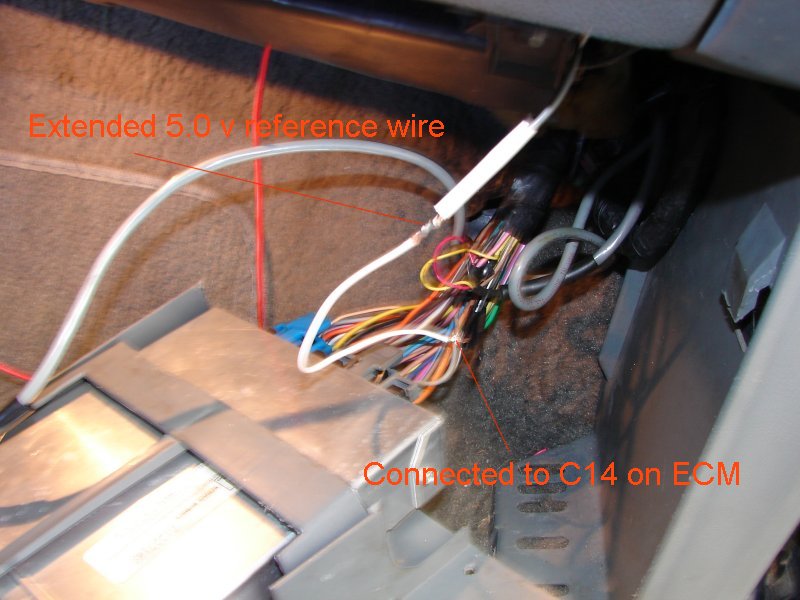
In the picture below, the gray wire with the black stripe is shown emerging from the bottom of the dash and has been extended with a piece of white wire beneath the length of unshrunk heat shrink. The other end of this white wire extension is tee'd into the gray wire coming from C14 of the ECM connector. C14 is the wire that supplies an accurate 5.0 reference voltage to the TPS, and, it makes a good source for the MAP. The gray wire to the MAP measured 5.03 volts when I finished.
Go here if you need an ECM wiring diagram.
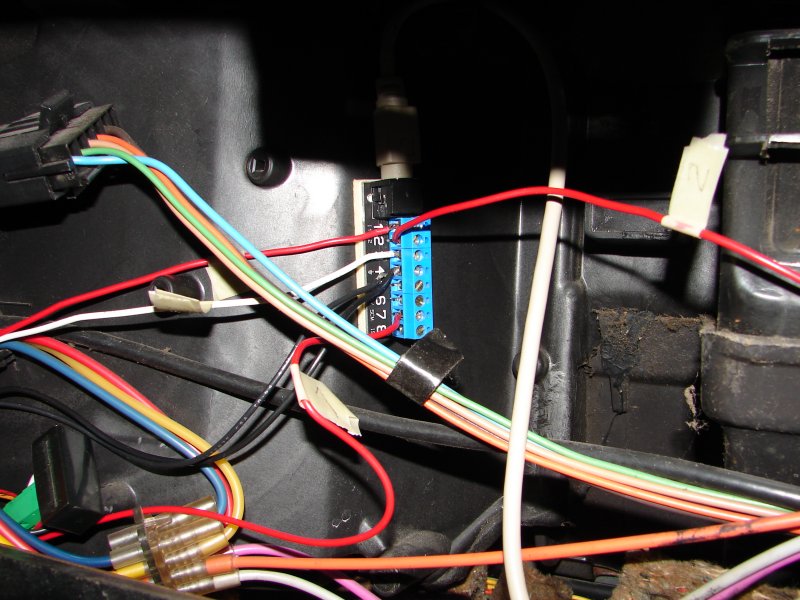
The red wire hanging out of the dash is the wire from the green signal wire to the analog input block (Analog Input #2).
Be sure all wiring connections are taped up so nothing can short out by accident somewhere down the line.

Below is a picture showing where I mounted the analog input block that is connected to the PL by the gray cable coming out of the top of the block. Picture taken thru the glove box door opening. Be sure to mount it such that you can see the connection ports and easily put a screwdriver on the clamp screws.
From top to bottom, wideband O2, MAP sensor, EGT, Grounds, Scanmaster. Bob Bailey does not suggest using the PL ground in most cases and I have removed them from the block after this picture was taken. An engine ground is a much better ground on our cars and the PL block was not made to take anything other than very low current devices.
